Modular Rail Modelling in New Zealand

Sunday, November 14, 2010

New and Improved Grass

I've started working on the modules again, and below you can see some pictures of my progress. The most significant thing I did was to add some additional colour to the grass. When I originally applied the static grass I only used one colour. This made the grass look quite uniform and unrealistic, and I wasn't really happy with it. My solution was to use the airbrush to add in various shades of brown and green, and I think it quite successfully adds depth and realism to the grass. The real impression isn't quite captured in these photos (I need a better camera!) but you get the idea. I think I'll use this technique next time too.


Photobucket

Photobucket

Photobucket

Photobucket

Photobucket

The other work I've done is to weather the buildings a little. I used an oil wash, some Tamiya rust coloured weathering powder, and a silver pencil to highlight some of the details. I also added in some rather randomly placed signals from the Trackgang range that I bought from Russell at the Convention and painted up. I'm sure the rivet counters will take me to task on the placement, but I think they do the job of adding a bit of necessary detail to the scenes.

Photobucket

Photobucket

Photobucket

What's next? I'm almost done with these three modules, so over my Christmas leave I'm going to start on the bench work for the next set of modules. I'm hoping to build another five sections and get this to the stage where I can run some trains, and then tackle the scenery.

Saturday, September 18, 2010

Time to get this hobby started again...

Winter is more or less over, I'll be much less busy with work soon, so it seems like it's time to dust off the modelling gear again. I'm going to start by doing the final detailing on the first three modules, and then in about a month's time I'm starting the next modules. Hopefully, by the end of the summer I will have a complete loop so I can run some trains!

By the way, the modules survived the recent Christchurch Earthquake without any damage (though the same can't be said of my nerves).

Keep an eye on this blog for the continuing tales of my excursion into modelling New Zealand rail in Freemo NZ120!

Wednesday, May 5, 2010

Building a bridge

Next up was building the bridge across the river. I thought that the most successful part of my previous layout was the river scene, so I wanted to duplicate something of that here. The river bed had been lined with lightweight hydrocal and painted, and the surrounding area had been given a little scenic treatment. The rail itself runs across the piece of thin mdf that was used to make the roadbed, and this would also act as part of the bridge structure. The prototype for the bridge was based (very loosely) on a number of bridges I've scene around the South Island, and I worked off several pictures I discovered on the net.

Photobucket

I was going to build the bridge out of dowel and strip wood, so there was another trip to the local hobby shop, who were getting to know me pretty well at this point. First up, I used some blocks of wood to make some concrete abutments for the ends of the span to sit on. This was then painted a vaguely concrete colour and weathered.

I then cut some rectangular strip wood into the parts of the bridge that would attach the pilings to the bridge span. (Obviously I know next to nothing about bridges, these bits probably have proper names!) Having glued these in place, I cut the dowel to the appropriate lengths, and more super glue was used to fix these to the structure, leaving me with the following:

Photobucket

Photobucket

Realistically, I think the dowel I used could have been a size thinner to give the bridge a more scale appearance.

I then cut up some sections of rail from the Peco track I had left over, and used these as diagonal braces for the bridge piers, which were also glued in place. Next, the whole thing was airbrushed a dark brown, which was probably the wrong colour on reflection; I think a sort of silvery brown/grey would have been more representative of aged wood. Let's just pretend that someone decided to paint this particular bridge!

As this stage the river bed was also painted a greenish grey. Once this was dry, I applied a liberal amount of PVA to the river banks, and sprinkled over this some course grade Woodland Scenics grey talus, which I think gives a nice impression of the rocks that can be seen in any number of South Island rivers. Around this I sprinkled pretty much an entire packet of finer grade talus, and then soaked this with scenic cement to fix it all in place. This was then left to dry, which took about a day.

Being a nice sunny Boxing Day when I was building this (accompanied by one or two festive beers) I took the whole module outside for some pictures.

Photobucket

Photobucket

Photobucket

I'm pretty happy with what I achieved with the bridge. All that remained at this point was to pour the water and add in some shrubbery and detail to the river bed, which I will cover in a future post.

Next time: experimenting with grass.

Sunday, April 25, 2010

Scenery, part 2

Back to the build updates! In my last build post, I got to the stage where the modules had been plastered. The next stage of the build was to seal this with a coat of paint. I chose a light brown colour, because, basically, I had a can of this left over form the last layout. It could have been darker, but for what I had planned it would do the job, as very little if any of the paint would eventually be seen.

Photobucket

Photobucket

This was also an opportune time to test the track again, and make some adjustments, so I got to have a little play with a locomotive. the modules were still running fine!

Photobucket

With my trusty airbrush, I next painted all of the trackwork a dark brown colour. Some layout I've seen go for rust coloured rails, but though this might be suitable for some areas, in general the rails around here appear a dull dark brown colour. (I've looked!) I didn't bother to mask the points at all, as it did not seem necessary.

Once this was dry, I decided to make the rock cutting for the river module. After masking the track to keep it clean, I mixed up some light weight hydrocal in a bowl, and applied this liberally to both sides of the cutting. Previously I have tried using Woodland Scenics Foam Putty for making rock faces, but I think that hydrocal does the job just as well. It's also a little more robust than the foam putty, which tends to soften when you paint it.

Photobucket

Leaving this to dry for a couple of days, I took to it with a craft knife to carve out the rock surface. I still need a lot of practice at this, but I'm fairly happy with the result. I'm sure I'll get more practice at this on the next modules I have planned.

Next, this was painted with some very diluted water based paints. I used a light brown, ochre, and finally a black stain in patches to give it a varied and natural look.

By this stage it was time to start thinking about grass and ground cover for the modules. Previously I had just used Woodland Scenic scatter of various shades, but this time I was keen to try out static grass, as I had recently seen a method of building an applicator on YouTube involving an electric fly swat. However, I decided to give the modules a base of scatter, and to apply the static grass over this to allow for a little variation in the appearance of the grass. So using three shades of Woodland Scenic ground foam, and plenty of PVA, I began to apply the grass, starting on the river module, leaving me with this:

Photobucket

It's amazing how the layout begins to spring to life when you get to this stage! Exciting!

Next time: building the bridge.

Sunday, April 18, 2010

Winter approaches...

Unfortunately, I haven't done any rail modelling since the convention. Last week I did set the modules up in the spare room, which is probably where they will stay over Winter. I've worked out that rearranged, there is just enough room in the spare room for an end to end "U" arrangement once I get some corner modules built. Realistically I'm probably not going to get much modelling done in the next couple of months given the busy time it is at work, so I'm probably going to take a break from trains for a couple of months. I'm also saving up for the next batch of modules, which I will probably begin in the second half of the year. Here's a few pics of the modules as they are now.

Photobucket

Photobucket

I will continue to update my build posts, with another one of these on the way shortly.

Saturday, April 3, 2010

Convention 2010 part 2

A little more from the convention. I wasn't able to attend for the entire day today, with work commitments and so forth, but I managed to spend a few hours over there. I has a couple more good discussion about the scale, and was able to catch up with Greg (Weeduggie) about the developments he is making. Russell from Trackgang also showed me the method for installing the new bearings he is including with his kits, and these give a very obvious improvement in performance.

Here are a couple more pictures, first one of Russell and his Trackgang table, and second of the excellent Kai Iwi Tunnel layout adjacent to our setup:

Photobucket

Photobucket

The convention has also been the prompt for a little thought on my part, so the following is an account of some of my recent cogitations.

First off, my big disappointment at the convention is not being able to run the layout because of its partially completed state. Of course this can't be helped given that I've only been building the thing for five months, but it has fueled my enthusiasm for finishing enough modules to form a loop to make running practicable.

At the least, this means five further sections, but ideally another seven, with four sections for the end pieces, and three for the other side of the loop. I've already got a number of ideas for what to put on the other sections scenic-wise, but I think I have decided to concentrate in the next six months on getting the framework built and track laid so to have a functioning layout. Then I can move on to the scenic work. I'll spend a bit of time soon calculating the amount of timber I'll need for the other sections (obviously it will be something like twice the amount that went into the current three sections). Hopefully I can get the materials and make a start on building these in the next couple of months.

Second, I've had a few thoughts about the scope of the scale for modelling. Looking around at the quality of the other modular layouts on display at the convention, I think our stuff compares very nicely, and it strikes me that our scale has a number of advantages, most obviously in terms of what can be put into a given space. Even though in comparison our scale looks quite dinky, I don't think you need to compromise in term of the level of detail you can put in NZ120.

There is occasionally talk about NZ120 being a "two foot scale" in that it's sufficient that it looks good from this distance and gives a good general impression. I'm not sure I agree with this, and in fact I think it sells the scale short in that there is plenty of potential to build detailed models that bear very close scrutiny. One of the most impressive things I've seen at the scale are Weeduggie's brass etches for various small locos. These look excellent, and I think that once they are built up and detailed, that they will build into very nice and detailed models.

We train modelers could improve the finishing we give our models. Even looking at some of the competition entries at the convention, I was struck by how the standard of much of the painting was not very good, and this really let down some otherwise fine models. We have a lot to learn from the painting and weathering techniques used in aircraft kitset modelling, I think. Some rail modelers seem very slow to adopt airbrushes for example, even though these provide vastly improved finishes over brush painting. Perhaps taking our scale to the next level should not merely be a matter of refining prototypical accuracy and the scale standards, but in refining the aesthetics of our models?

Friday, April 2, 2010

Convention 2010

I've been attending the Convention all day, so I thought I would update and share some pics. I've met a bunch of people that I've only known from online, and for the most part they haven't been completely insane. (Being a model railway convention, I have met a couple of those people today however!)

Photobucket

Graham (Greytrainz) called me late on Wednesday night suggesting that we take my modules to represent NZ120 at the convention. I accepted his generous offer, and so I took Thursday off work to put some last minute detail on the modules and get them presentable. Graham turned up at about five that evening, and we took them over to the venue and set them up (helped by Jolon and Russell).

Photobucket

I spent most of today hanging around by the modules and chatting with other modelers. Most had good things to say, and it was nice to get some feedback. We had some of Jolon's and Graham's models set up on the modules, and it looked a pretty good display. Jolon had one of John Rappard's old Abs on display, which is a very nice model.

Photobucket

Graham's work on styrene etched buildings is pretty impressive by the way, I'm looking forward to getting hold of some of these.

Russell from Trackgang was there with his range, and impressive it is too. I'm looking forward to building more of the stuff. Especially impressed by some of his loco builds. I'm tempted to build a Dg after seeing what he has managed with the kit! Today he managed to sell me some premade signals, which will be going on the modules.

Photobucket

Tonight's SIG was busy and positive, with lots of discussion about the future of the scale, though we could have done with more time.

Tomorrow I'm planning to attend a couple of clinics, including one on modeling New Zealand scenery. I'm hoping to learn some techniques for making native flora.

Sunday, March 28, 2010

Station improvements

I was a little unsatisfied my station, so this week I fixed the windows and gave it a new paint job. It's yet to be weathered and glazed, but I think it already looks better than it previously did.

Photobucket

Photobucket

Photobucket

Sunday, March 21, 2010

Scenery, part 1

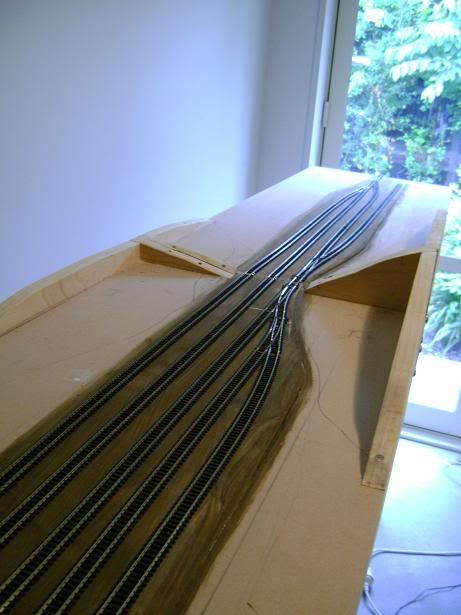
In my last full update I detailed how I had laid the track, and noted that I was happy to be done with it. Largely this was because I got to move on to my favourite aspect of modelling: the scenery.

Mostly, I think I model because I like the art and craft aspect of the modelling, especially of landscapes. I just really like how models look for some basic psychological reason. Railways provide a subject matter, and of course they have their own intrinsic interest, with the ability to build a model that actually functions and has some operational (play) interest. But I'm not really train nerd. This probably also explains my lack of ability to get motivated to build rolling stock in a way that I can get motivated to build scenery.

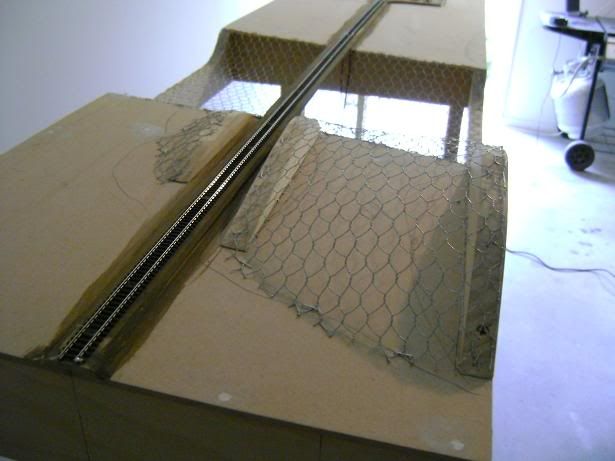
Anyway, onto the scenery for the modules. In my past layouts I've adopted a preferred method of scenery building, which is to build the frame out of timber, and lay over this a skin of chicken wire to which I then apply plaster gauze. This isn't either the lightest method nor the cheapest, but it gives a very solid base to the scenery, and it's desirable in a number of other ways that I will mention.

So the first step is to build the framework for the hills and so on. On the current modules the hills are fairly minimal, so this didn't take long at all. The scenery formers were cut out of the timber that was left over form building the framework, and then screwed and glued to the modules.

Photobucket

Photobucket

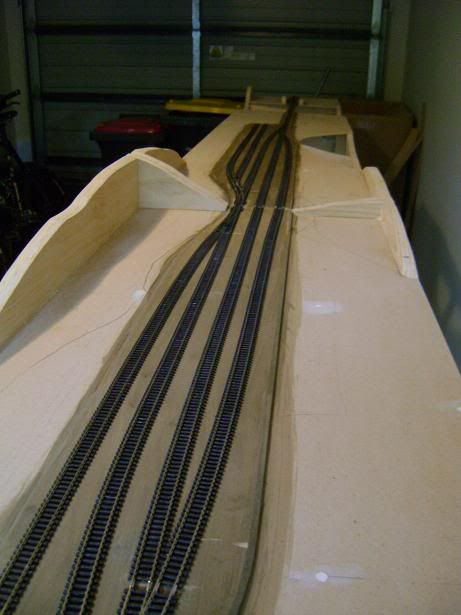
This whole process tends to add more strength to the modules (that that they really needed it) and so everything is nice and rigid (and heavier) now.

Photobucket

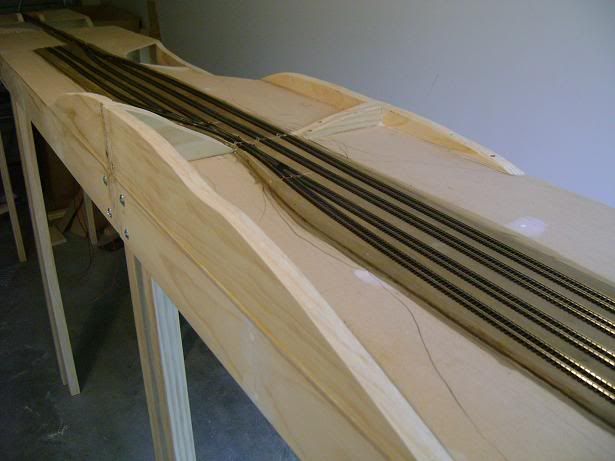
After I was happy with this, I sanded the scenery formers, and then cut the chicken wire to fit. This was then stapled down, and trimmed along the edges, taking care to remove any sharp and prominent bits of wire so as to avoid later annoyance.

Photobucket

Photobucket

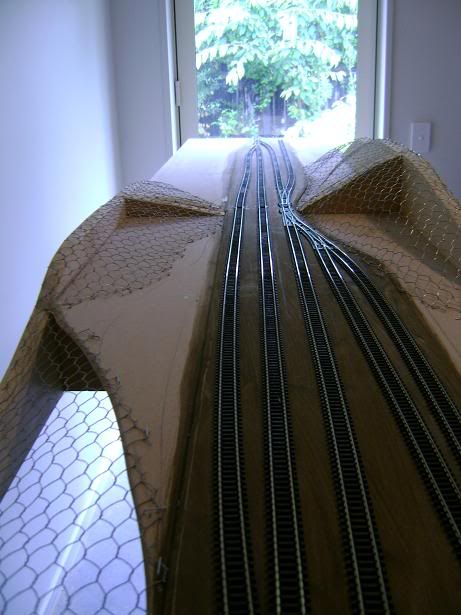
For little lumps and bumps where the method described above would be overkill, I crumple up newspaper and tape this down with masking tape so that it forms small hills and undulations.

Next is the messy (and fun) bit: applying the plaster gauze. I'm using the Woodland Scenics gauze. As you might have noticed, I use a fair bit of their range. I generally like the look of Woodland Scenics range, plus my local hobby shop stocks most of it, so it is convenient. Again though, it's not the cheapest, and I'm sure more frugal modelers could find ways to cut down on costs.

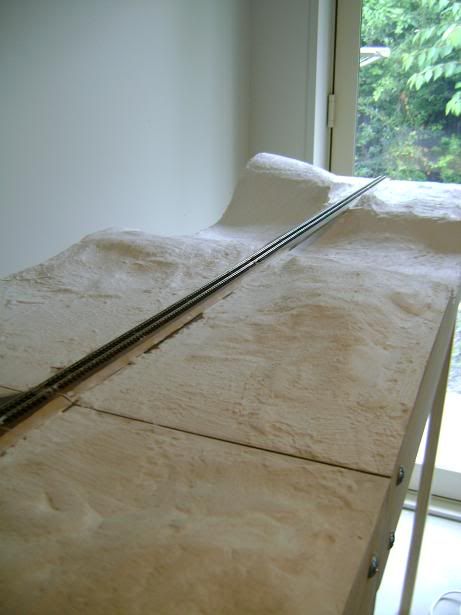
I cut the plaster gauze up into manageable sections, quickly soak kit in a bowl of water, and then apply it, using at least two layers and smoothing it out as it dries. After this, I mix up a bowl of lightweight hydrocal, which is a type of plaster that is useful for making rock molds and also for surfacing the scenery. Using a medium size house paint brush I brush on the hydrocal, which has the consistency of watery pancake batter, but which quickly hardens.

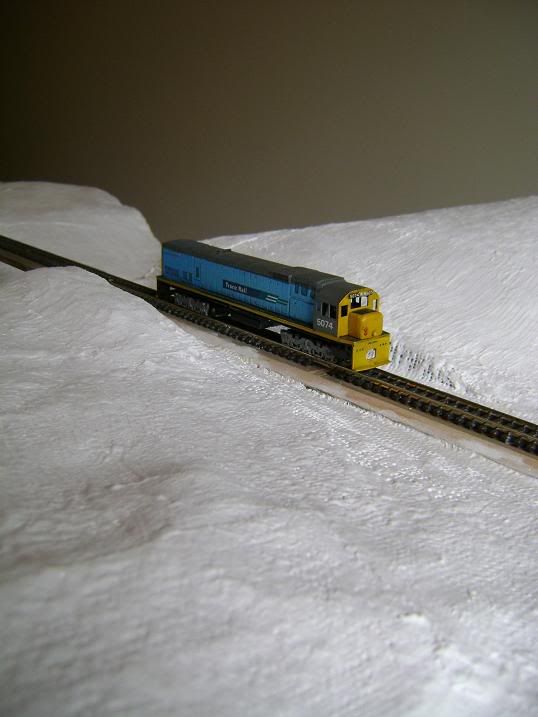
After all this dries for a day, I'm left with this:

Photobucket

Photobucket

That's all for now. In the next post I'll describe how I add grass to the surface, and how I built the rock cutting on the river module.

Back on track...

Okay, so I can use lame puns too. Here is the most recent work I've done on the layout. I added some more trees and shrubbery. It took all of ten minutes. As previously, the trees are from the Woodland Scenics range. They're expensive, but I like the look. I'll be making my own trees soon though.

Photobucket

Photobucket

Monday, March 15, 2010

Stalled...

I haven't updated in a while. To be honest, I'm a bit stalled on the modelling front at the moment. For a start my laptop, and all my photos of the layout is still missing in action. Secondly, the water in the river has on the module has developed an annoying milky appearance in a few spots. I'm not sure why, and I'm not sure how to fix it. I'm not even sure if I should fix it, as my annoyance may be a result of my perfectionism/anal retentiveness. Lastly, work is again very busy, so there is hardly any time to do anything anyway.

Anyway, I may step away from the modules for a couple of weeks to clear my head and get motivated again. I can't complain, I've had a very good run over the last few months!

On another front, the convention is looming up. I had toyed with the thought of entering the modules in competition, but I'm simply to busy at the moment to consider that. I'll be in attendance anyway, and hopefully it will help on the motivation front. And it will be good to meet up with some like-minded folk and see what other people are up to.

Sunday, March 7, 2010

Latest Progress

I did a bit more work this weekend, but I'm still without my laptop. Here's a nice picture of the river module I just took to make up for the lack of a real post.

Photobucket

Here's a peek at this weekend's work. I built several Trackgang containers kits, and also added some concrete buffer stops. The containers were painted with Tamiya acrylics and weathered with an oil wash and Tamiya rust coloured weathering powder, which does quite a nice job of dulling down the paint surface.

Photobucket

Thursday, March 4, 2010

Another building

Unfortunately my laptop screen died last week, forcing a temporary hiatus on the posts about the layout building, but I've been busy working on the layout nevertheless. Last weekend I built an engineering workshop. Still lots more work needed on this, but here are some pictures:

Photobucket

Photobucket

Photobucket

I've also ordered a number of new detail pieces from the guys at Trackgang Products, and these will be placed on the layout this week.

It's been suggested that I enter these in competition at the upcoming Convention. That certainly gives me a deadline to work to.

Photobucket

Friday, February 26, 2010

Goods shed!

Another quick update before a full post this weekend. This week I built the first of the new structures: a goods shed. It still needs a bit of detailing and work on the surrounds, but it does the job. It's made out of styrene and a bit of mdf for the steps. It's airbrushed with my crappy Tamiya Sprayworks, and weathered with a bit of dry brushing and an oil wash.

Photobucket

Photobucket

Sunday, February 21, 2010

Laying the track, part 2

In the last of the build posts I got to the stage where the roadbed was down, and the modules awaited their track. One thing I did to at this stage was to drill the holes in the module ends through which the connecting bolts would go. Once this was done, I bolted the modules together. Most of the joins were nicely flush, but there was a bit of sanding needed here and there.

Photobucket

I decided to lay the track on the bridge module first to get a bit of practice before moving onto the more complex track arrangement on the yard sections.

Photobucket

Stage one of laying the track was attaching the track to the outer edge. Because it is inevitable that the sharp track ends will be accidentally snagged at some stage, it is necessary to fix them at the edges. I decided to drive nails in alongside the track, and then solder the rails to these. While this works satisfactorily, it doesn't give the cleanest look. In the future I will solder the rails to screws driven in directly under the rails.

Photobucket

The track on the river section amounted to one and a bit lengths of flex track, so the appropriate length of flex track was cut with the Dremel cutting tool. After soldering the track sections together at the joiner, I soldered feeder wires to the bottom of the track, and fed these through holes I had drilled in the basedboard. I then glued the track down with PVA, and soldered the other end to the nails. A few dabs of PVA is strong enough for gluing the track down at this stage, because once the track is ballasted, there is no way it's coming back up again! Finally, I filed down the track ends flush with the end of the modules.

Next, I moved onto the yard sections, again starting at the edge and moving inwards. As predicted, the yard section was much more complicated. For a start, fitting the points together in the desired arrangement meant trimming the sleepers in various places. Thinking ahead, I drilled holes beneath the points in the appropriate places so that point motors could be attached at a later date. Also, I removed a couple of sleepers form each end of the points to make attaching and soldering the rail joiners an easier job. Replacing these sleepers would be one of the last jobs of the track laying.

Photobucket

Attaching the various feeder wires also took time. To simplify matters, I added feeders to all of the sections of track so as to not rely on the contact of the point blades to feed the sections of track with electricity. I had always planned on running the modules with DCC, and thankfully this makes wiring a great deal more simple. Still, I expect I could have got away with fewer feeders, but I thought the extra time spent adding them would ultimately mean better running performance in the future. With this in mind I also decided to solder all the rail joiners, though this was a decision I was not entirely happy with later on, as I will explain in a future post.


Photobucket

After a great deal of cutting, trimming, soldering, hole-drilling, and filing (and some annoyed swearing), I finished laying the track. At this stage I had not glued it down, as I thought it was wise to thoroughly test the track for a period before fixing it permanently.

Photobucket

I was pretty satisfied with how things had gone, and glad to be finished. I'm in awe of those modelers who hand build track; for me laying commercial track is enough of an ordeal. Still, time and effort put in at this stage of the build is crucial to the running quality you eventually get.

Photobucket

Next time: starting on the scenery.