Free-mo NZ

Modular Rail Modelling in New Zealand

Monday, March 5, 2012

Back from the wilderness.

It's been nearly a year since my last post. At about that time I felt like my future was up in the air, and the last thing I felt like doing was playing with trains. In the time since, I've sold the NZ120 modules and got on with other things.

But... inevitably when things did settle down at home I got into the hobby again. I have a new big project underway. It's an American N Scale layout built in three sections. It has a decent sized loop and in based in New Mexico. I guess I'm about halfway finished this. Here are some pictures of the new layout.

Photobucket

Photobucket

Photobucket

Photobucket

Photobucket


The inspiration for this come from a trip I took to America in October last year when I rode the Southwest Chief from Los Angeles to Chicago. It was an awesome trip on which I saw a lot of pumpkin orange BNSF units, of which I now have several Kato N scale versions.

I'm also edging my way back toward Free-mo. Unfortunately it won't be in NZ120. Though I love the idea of modelling the New Zealand protoype, one thing I discovered whilst building the previous modules is that my interest in model rail is definitely in building layouts and especially scenery. When it comes to acquiring rolling stock, RTR is my favoured option for a number of reasons, and this is the fatal point for NZ120 for me. Lazy of me, I know.

So, my re-entry into Free-mo will be in another prototype and scale... More on this soon.

Monday, March 7, 2011

On Earthquakes...

Shit happens, in this case a couple of major earthquakes in Christchurch. Work and personal life has been hectic, not to mention stressful. At the same time my career is moving ahead quickly and I find myself with lots of new exciting work to be doing (including a new book to write over the next year). As a result I have achieved next to nothing in the last six months after intending to get back into the rail modelling late last year.

The good news is that the modules survived unscathed through the quakes even though a lot of other stuff at my place did not. I guess the legs were sturdy enough after all! I hope to pick the modelling up later on in the year after things have calmed down a bit, and I have lots of plans percolating away in the my brain. See you sometime in the future.

Grant

Sunday, November 14, 2010

New and Improved Grass

I've started working on the modules again, and below you can see some pictures of my progress. The most significant thing I did was to add some additional colour to the grass. When I originally applied the static grass I only used one colour. This made the grass look quite uniform and unrealistic, and I wasn't really happy with it. My solution was to use the airbrush to add in various shades of brown and green, and I think it quite successfully adds depth and realism to the grass. The real impression isn't quite captured in these photos (I need a better camera!) but you get the idea. I think I'll use this technique next time too.


Photobucket

Photobucket

Photobucket

Photobucket

Photobucket

The other work I've done is to weather the buildings a little. I used an oil wash, some Tamiya rust coloured weathering powder, and a silver pencil to highlight some of the details. I also added in some rather randomly placed signals from the Trackgang range that I bought from Russell at the Convention and painted up. I'm sure the rivet counters will take me to task on the placement, but I think they do the job of adding a bit of necessary detail to the scenes.

Photobucket

Photobucket

Photobucket

What's next? I'm almost done with these three modules, so over my Christmas leave I'm going to start on the bench work for the next set of modules. I'm hoping to build another five sections and get this to the stage where I can run some trains, and then tackle the scenery.

Saturday, September 18, 2010

Time to get this hobby started again...

Winter is more or less over, I'll be much less busy with work soon, so it seems like it's time to dust off the modelling gear again. I'm going to start by doing the final detailing on the first three modules, and then in about a month's time I'm starting the next modules. Hopefully, by the end of the summer I will have a complete loop so I can run some trains!

By the way, the modules survived the recent Christchurch Earthquake without any damage (though the same can't be said of my nerves).

Keep an eye on this blog for the continuing tales of my excursion into modelling New Zealand rail in Freemo NZ120!

Wednesday, May 5, 2010

Building a bridge

Next up was building the bridge across the river. I thought that the most successful part of my previous layout was the river scene, so I wanted to duplicate something of that here. The river bed had been lined with lightweight hydrocal and painted, and the surrounding area had been given a little scenic treatment. The rail itself runs across the piece of thin mdf that was used to make the roadbed, and this would also act as part of the bridge structure. The prototype for the bridge was based (very loosely) on a number of bridges I've scene around the South Island, and I worked off several pictures I discovered on the net.

Photobucket

I was going to build the bridge out of dowel and strip wood, so there was another trip to the local hobby shop, who were getting to know me pretty well at this point. First up, I used some blocks of wood to make some concrete abutments for the ends of the span to sit on. This was then painted a vaguely concrete colour and weathered.

I then cut some rectangular strip wood into the parts of the bridge that would attach the pilings to the bridge span. (Obviously I know next to nothing about bridges, these bits probably have proper names!) Having glued these in place, I cut the dowel to the appropriate lengths, and more super glue was used to fix these to the structure, leaving me with the following:

Photobucket

Photobucket

Realistically, I think the dowel I used could have been a size thinner to give the bridge a more scale appearance.

I then cut up some sections of rail from the Peco track I had left over, and used these as diagonal braces for the bridge piers, which were also glued in place. Next, the whole thing was airbrushed a dark brown, which was probably the wrong colour on reflection; I think a sort of silvery brown/grey would have been more representative of aged wood. Let's just pretend that someone decided to paint this particular bridge!

As this stage the river bed was also painted a greenish grey. Once this was dry, I applied a liberal amount of PVA to the river banks, and sprinkled over this some course grade Woodland Scenics grey talus, which I think gives a nice impression of the rocks that can be seen in any number of South Island rivers. Around this I sprinkled pretty much an entire packet of finer grade talus, and then soaked this with scenic cement to fix it all in place. This was then left to dry, which took about a day.

Being a nice sunny Boxing Day when I was building this (accompanied by one or two festive beers) I took the whole module outside for some pictures.

Photobucket

Photobucket

Photobucket

I'm pretty happy with what I achieved with the bridge. All that remained at this point was to pour the water and add in some shrubbery and detail to the river bed, which I will cover in a future post.

Next time: experimenting with grass.

Sunday, April 25, 2010

Scenery, part 2

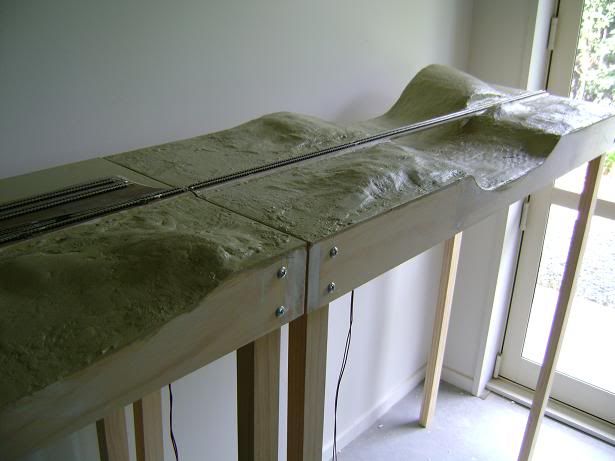
Back to the build updates! In my last build post, I got to the stage where the modules had been plastered. The next stage of the build was to seal this with a coat of paint. I chose a light brown colour, because, basically, I had a can of this left over form the last layout. It could have been darker, but for what I had planned it would do the job, as very little if any of the paint would eventually be seen.

Photobucket

Photobucket

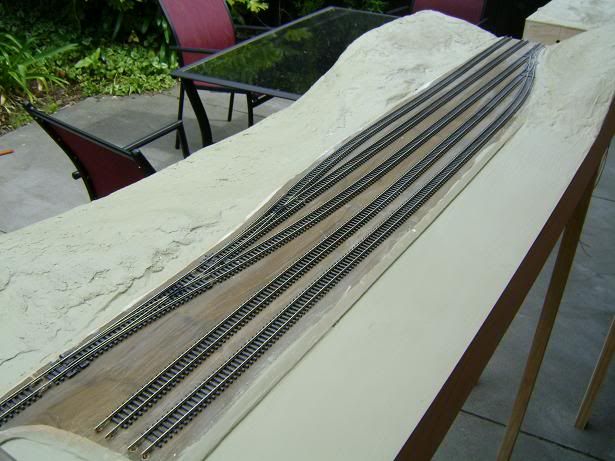
This was also an opportune time to test the track again, and make some adjustments, so I got to have a little play with a locomotive. the modules were still running fine!

Photobucket

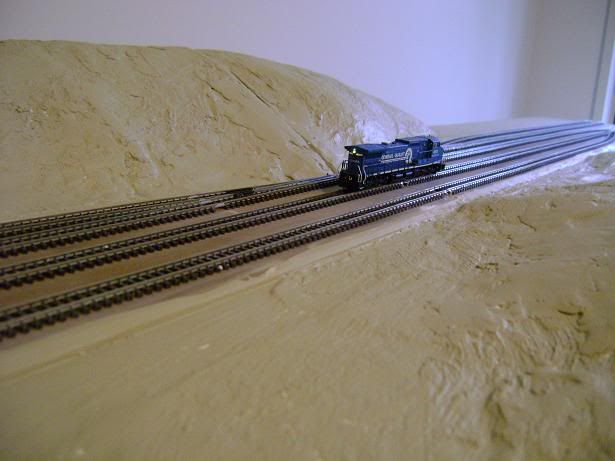
With my trusty airbrush, I next painted all of the trackwork a dark brown colour. Some layout I've seen go for rust coloured rails, but though this might be suitable for some areas, in general the rails around here appear a dull dark brown colour. (I've looked!) I didn't bother to mask the points at all, as it did not seem necessary.

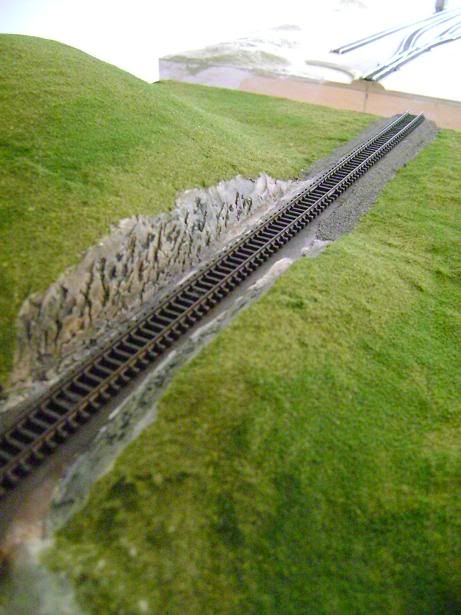
Once this was dry, I decided to make the rock cutting for the river module. After masking the track to keep it clean, I mixed up some light weight hydrocal in a bowl, and applied this liberally to both sides of the cutting. Previously I have tried using Woodland Scenics Foam Putty for making rock faces, but I think that hydrocal does the job just as well. It's also a little more robust than the foam putty, which tends to soften when you paint it.

Photobucket

Leaving this to dry for a couple of days, I took to it with a craft knife to carve out the rock surface. I still need a lot of practice at this, but I'm fairly happy with the result. I'm sure I'll get more practice at this on the next modules I have planned.

Next, this was painted with some very diluted water based paints. I used a light brown, ochre, and finally a black stain in patches to give it a varied and natural look.

By this stage it was time to start thinking about grass and ground cover for the modules. Previously I had just used Woodland Scenic scatter of various shades, but this time I was keen to try out static grass, as I had recently seen a method of building an applicator on YouTube involving an electric fly swat. However, I decided to give the modules a base of scatter, and to apply the static grass over this to allow for a little variation in the appearance of the grass. So using three shades of Woodland Scenic ground foam, and plenty of PVA, I began to apply the grass, starting on the river module, leaving me with this:

Photobucket

It's amazing how the layout begins to spring to life when you get to this stage! Exciting!

Next time: building the bridge.

Sunday, April 18, 2010

Winter approaches...

Unfortunately, I haven't done any rail modelling since the convention. Last week I did set the modules up in the spare room, which is probably where they will stay over Winter. I've worked out that rearranged, there is just enough room in the spare room for an end to end "U" arrangement once I get some corner modules built. Realistically I'm probably not going to get much modelling done in the next couple of months given the busy time it is at work, so I'm probably going to take a break from trains for a couple of months. I'm also saving up for the next batch of modules, which I will probably begin in the second half of the year. Here's a few pics of the modules as they are now.

Photobucket

Photobucket

I will continue to update my build posts, with another one of these on the way shortly.